first piston valve

no, his work doesn't  however the piston actually looks heavier than it is. it only weighs 234 grams. and, i need to cut about .25" off of it. but if you still think i should make it into a cup, i have a friend who's dad is interested in my project, and he works in a machine shop, so that may be an option.
-
Technician1002
- Captain

- Posts: 5189
- Joined: Sat Apr 04, 2009 11:10 am
I do not recommend making a hollow acrylic piston. acrylic is more brittle than PVC. I highly recommend a good bumper.
Acrylic stress cracks

Acrylic stress cracks
Alright guys. so today I began preparation for assembly. I have cut my the chamber pipe to length, cut all of the connector pipe, and I have sanded and cleaned all the fittings. Then I mocked up the whole cannon. (I forgot to take a picture, sorry). However I can tell you that I am 6' and the whole thing is taller than me, when standing on end  . I can't wait to finish it, but will have to wait until I get the last piece I need.
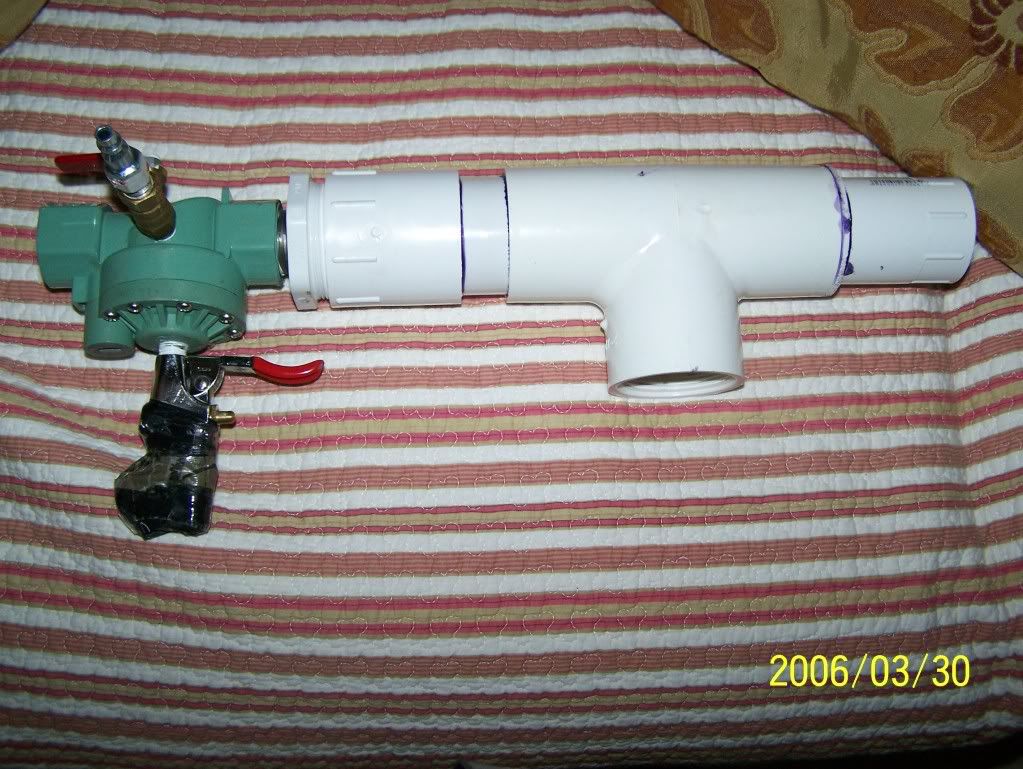
Now I am working on the sprinkler valve and the air fill connection, but have a question. Should I just have the air go directly into the pilot and leak around the piston to fill the chamber or should/could I do something like the picture below? and yes, the sprinkler is apart, my dad is taking it to work to drill and tap the hole for the hose and blowgun.
The idea is that I hook up my compressor and then open the pvc valve, and pressurize the pilot. then I open the metal valve to pressurize the chamber , all the while keeping the pvc valve open. Then once the whole thing is filled I close both valves and disconnect my compressor.

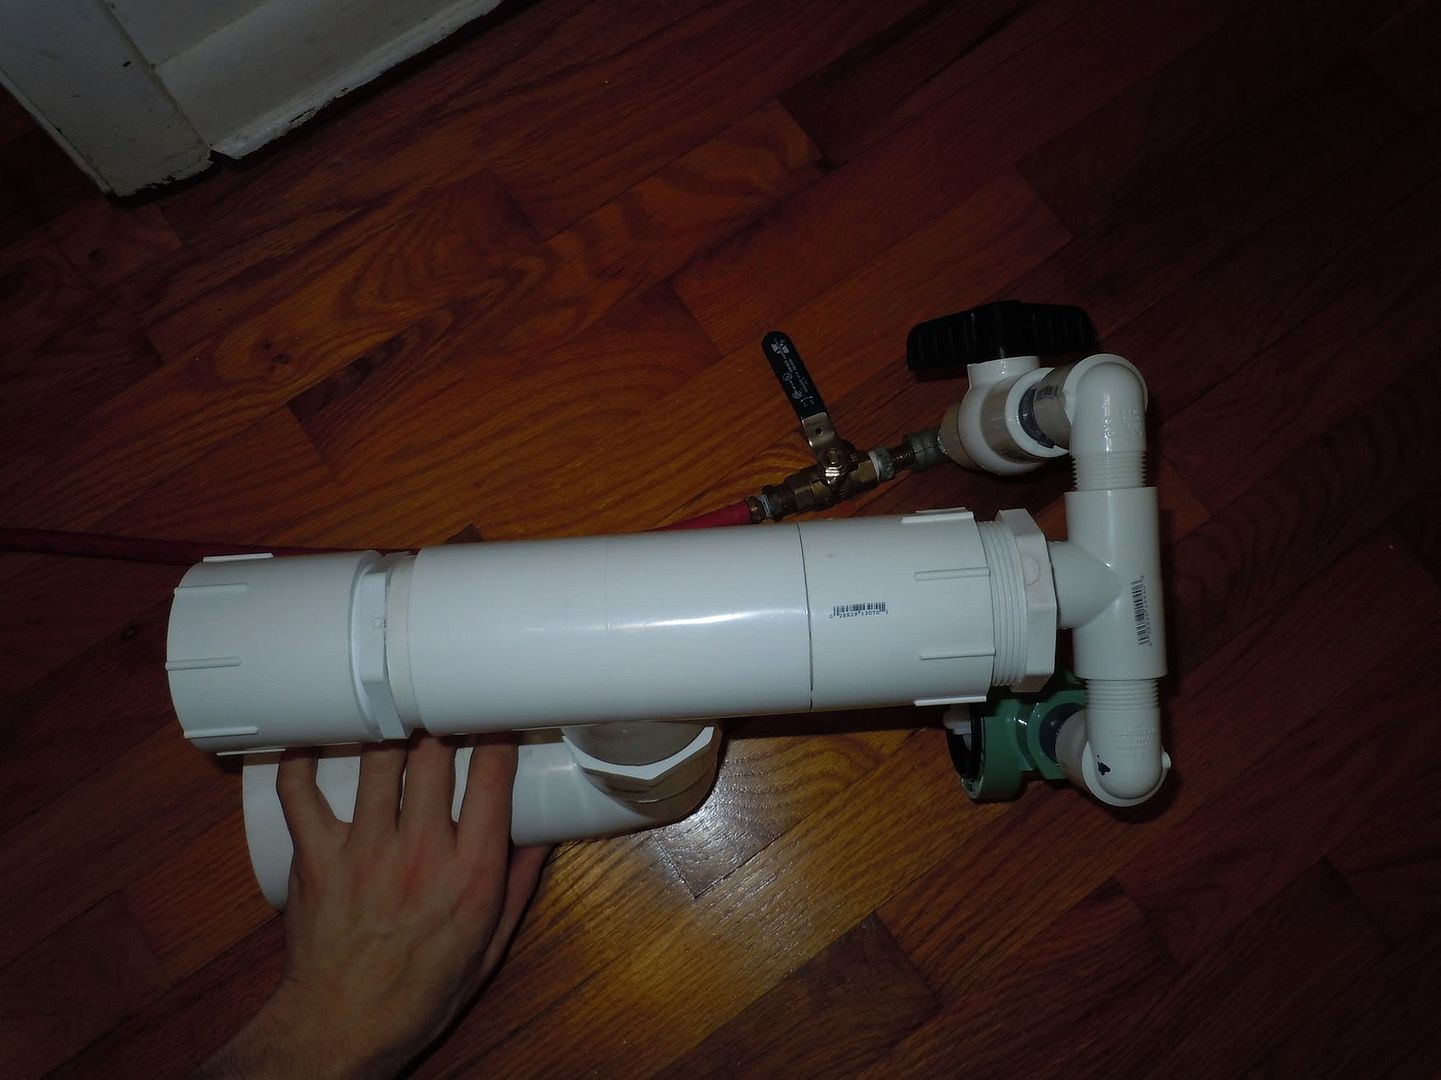
The whole idea behind this is so that it doesn't take forever to fill, but this is all just a theory. I am sure there is an inherent flaw in this design, and I look forward to you (Technician most likely OR you Gun Freak ) pointing it out. As always if you see a flaw in my design tell me, and any input or suggestions are appreciated, thanks.
Now I am working on the sprinkler valve and the air fill connection, but have a question. Should I just have the air go directly into the pilot and leak around the piston to fill the chamber or should/could I do something like the picture below? and yes, the sprinkler is apart, my dad is taking it to work to drill and tap the hole for the hose and blowgun.
The idea is that I hook up my compressor and then open the pvc valve, and pressurize the pilot. then I open the metal valve to pressurize the chamber , all the while keeping the pvc valve open. Then once the whole thing is filled I close both valves and disconnect my compressor.
The whole idea behind this is so that it doesn't take forever to fill, but this is all just a theory. I am sure there is an inherent flaw in this design, and I look forward to you (Technician most likely
-
Technician1002
- Captain
- Posts: 5189
- Joined: Sat Apr 04, 2009 11:10 am
That should work. My biggest concern is related to the amount of plumbing in the pilot. With cannon recoil or air hose handling in that area may cause a failure.
Here is an example;
[youtube][/youtube]
Tapping the body of the sprinkler valve or large coupling on the breech may be better. Eliminate all elbows from the pilot if possible.
Here is an extreme example of a pilot with minimal plumbing.

Yes it works. Fill is directly into the chamber. Valve is closed by blowing into the pilot and closing the trigger valve. This is built like the Mouse Musket in my sig.
Here is an example;
[youtube][/youtube]
Tapping the body of the sprinkler valve or large coupling on the breech may be better. Eliminate all elbows from the pilot if possible.
Here is an extreme example of a pilot with minimal plumbing.
Yes it works. Fill is directly into the chamber. Valve is closed by blowing into the pilot and closing the trigger valve. This is built like the Mouse Musket in my sig.
Wow... The first time I read through your post I thought you said by tape-ing it to the breech.... I feel dumb now. However after reading your edit I understand what you meant.
however I don't know how I would be able to do that. When you say
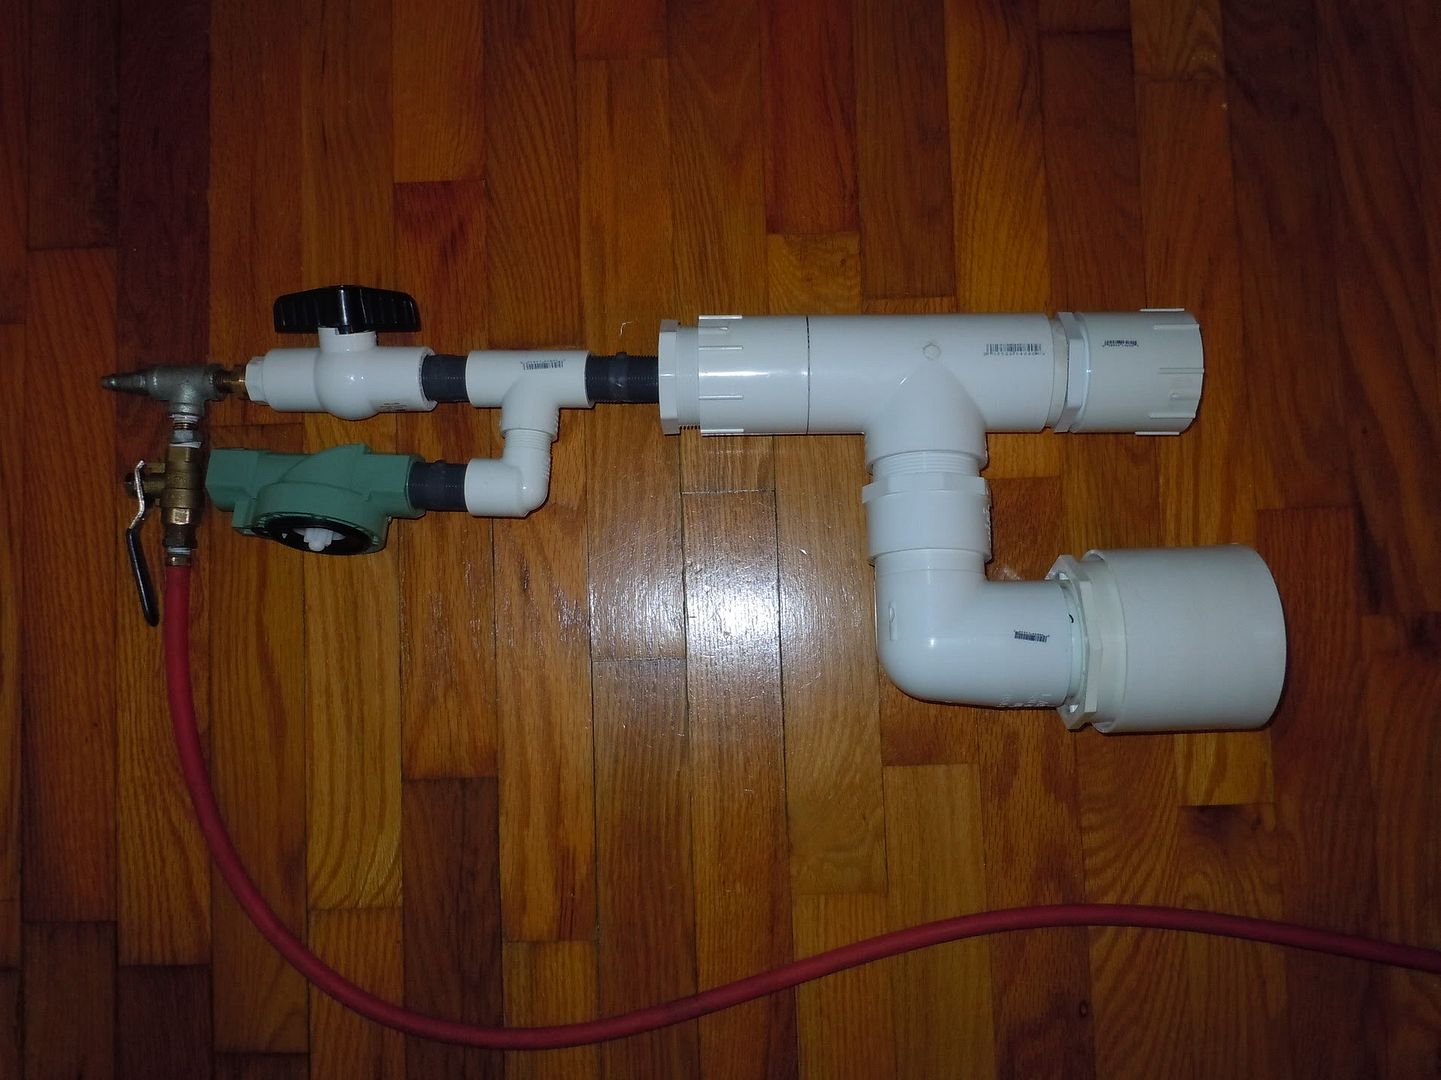
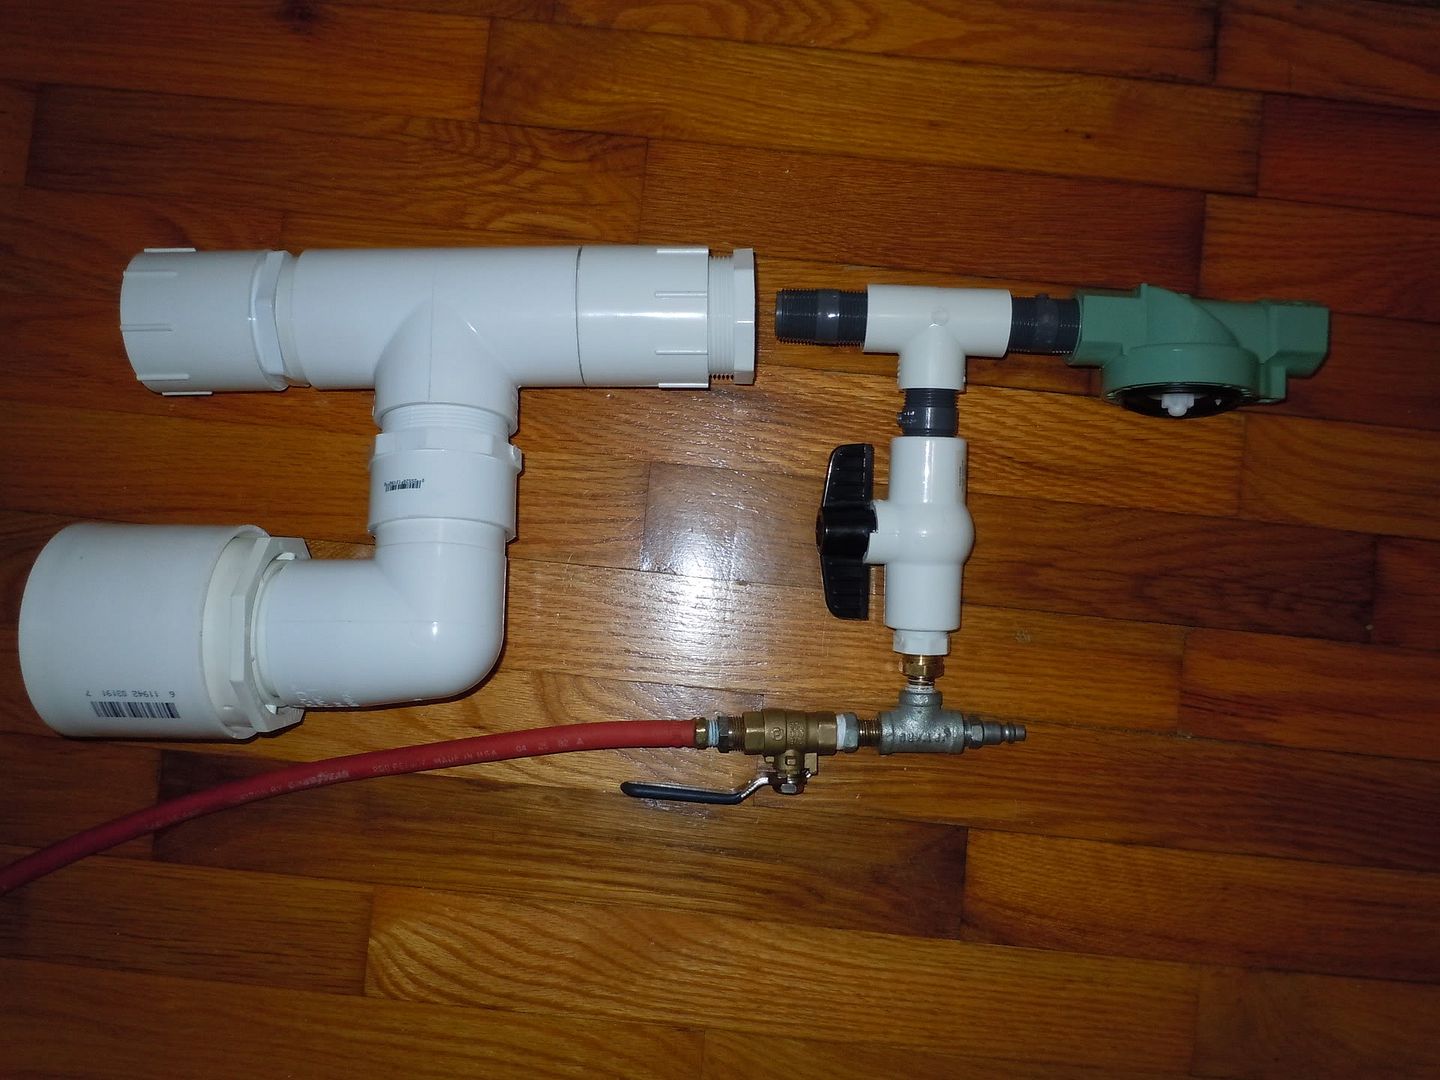
I came up with some more configurations by removing one of the elbows. Although they are not much of an improvement. And the hose is going to be cut to length once I figure out the configuration.

 [/quote]
however I don't know how I would be able to do that. When you say
what do you blow into it with?Valve is closed by blowing into the pilot and closing the trigger valve
I came up with some more configurations by removing one of the elbows. Although they are not much of an improvement. And the hose is going to be cut to length once I figure out the configuration.
[/quote]-
Gun Freak

- Lieutenant 5

- Posts: 4971
- Joined: Mon Jan 25, 2010 4:38 pm
- Location: Florida
- Been thanked: 8 times
His mouthwhat do you blow into it with?
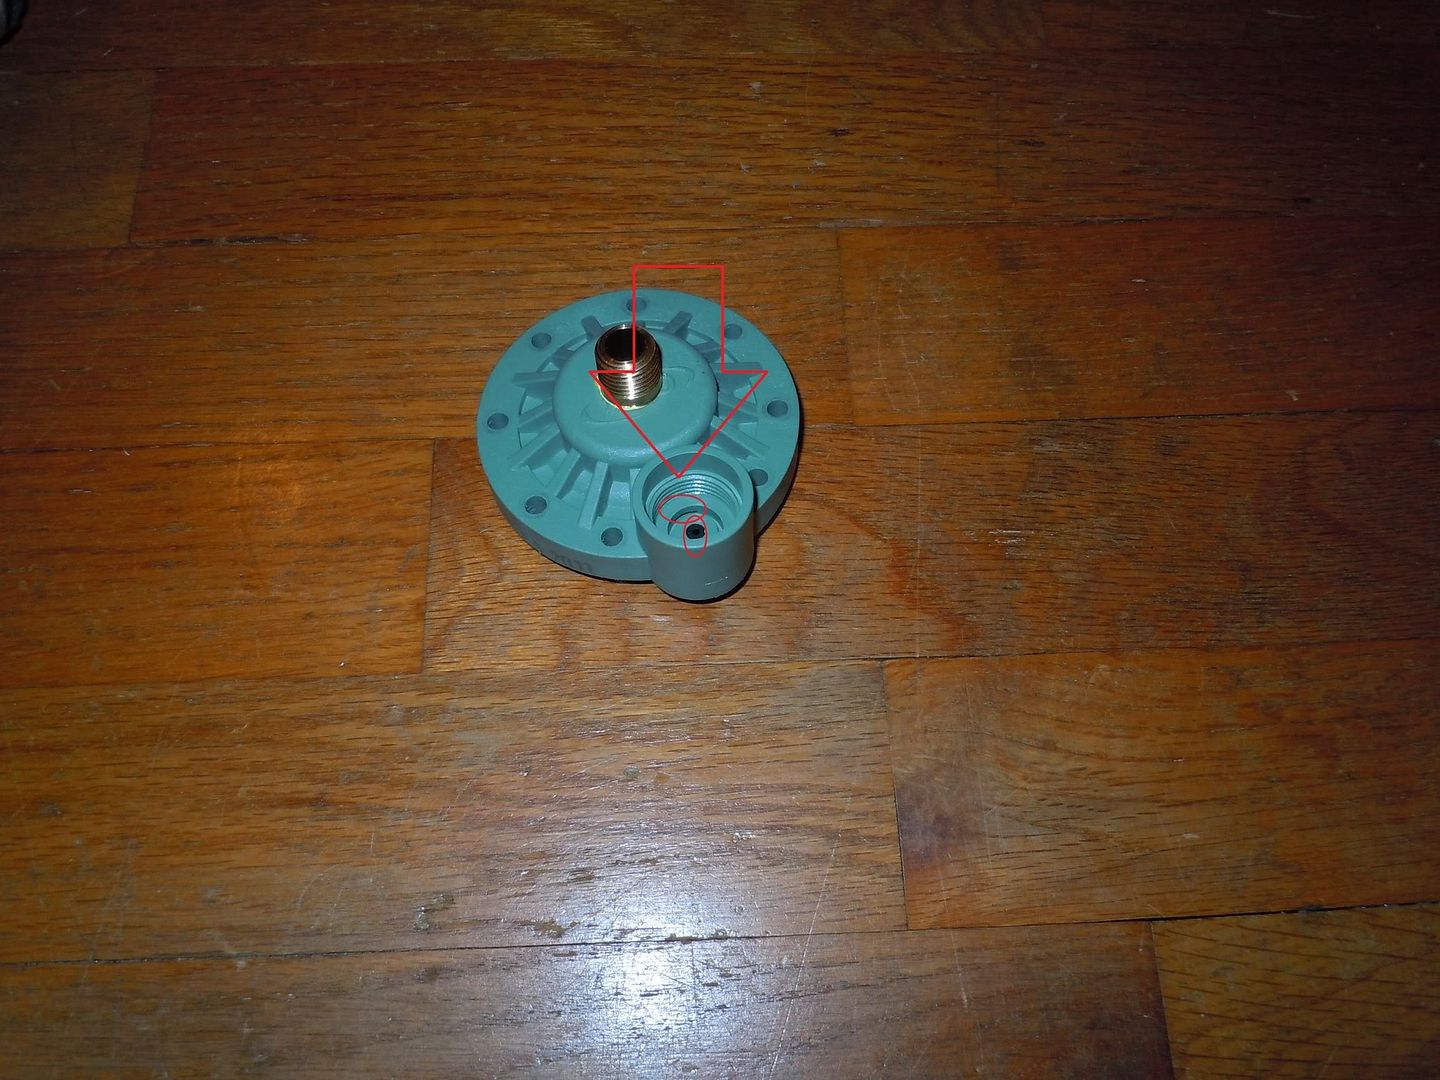
I personally think you should put the sprinkler valve directly behind the piston valve and then tap into the sprinkler valve itself. I have done this many times in different spots. Just be extra careful when you go to drill into it... I went into the seat with a drillbit and now the valve is ruined
But I think it is way stronger and secure if you drill and tap where the red is in the following picture. When I made a cannon exactly like yours for a friend, that is how I did it. It turned out to be a beast. Anyway, if you decide to drill and tap here, be careful because you need to drill in just the right spot or else the fitting you thread in will interfere with the grooves on the diaphragm and it won't be able to go in. When I did it, it interefered a little but it still worked fine. If you don't understand what I mean I can clearify a bit.
- Attachments
-
OG Anti-Hybrid
One man's trash is a true Spudder's treasure!
Golf Ball Cannon "Superna" ■ M16 BBMG ■ Pengun ■ Hammer Valve Airsoft Sniper ■ High Pressure .22 Coax
Holy Shat!
One man's trash is a true Spudder's treasure!
Golf Ball Cannon "Superna" ■ M16 BBMG ■ Pengun ■ Hammer Valve Airsoft Sniper ■ High Pressure .22 Coax
Holy Shat!
I figured, but I was just checking.Gun Freak wrote:His mouthwhat do you blow into it with?
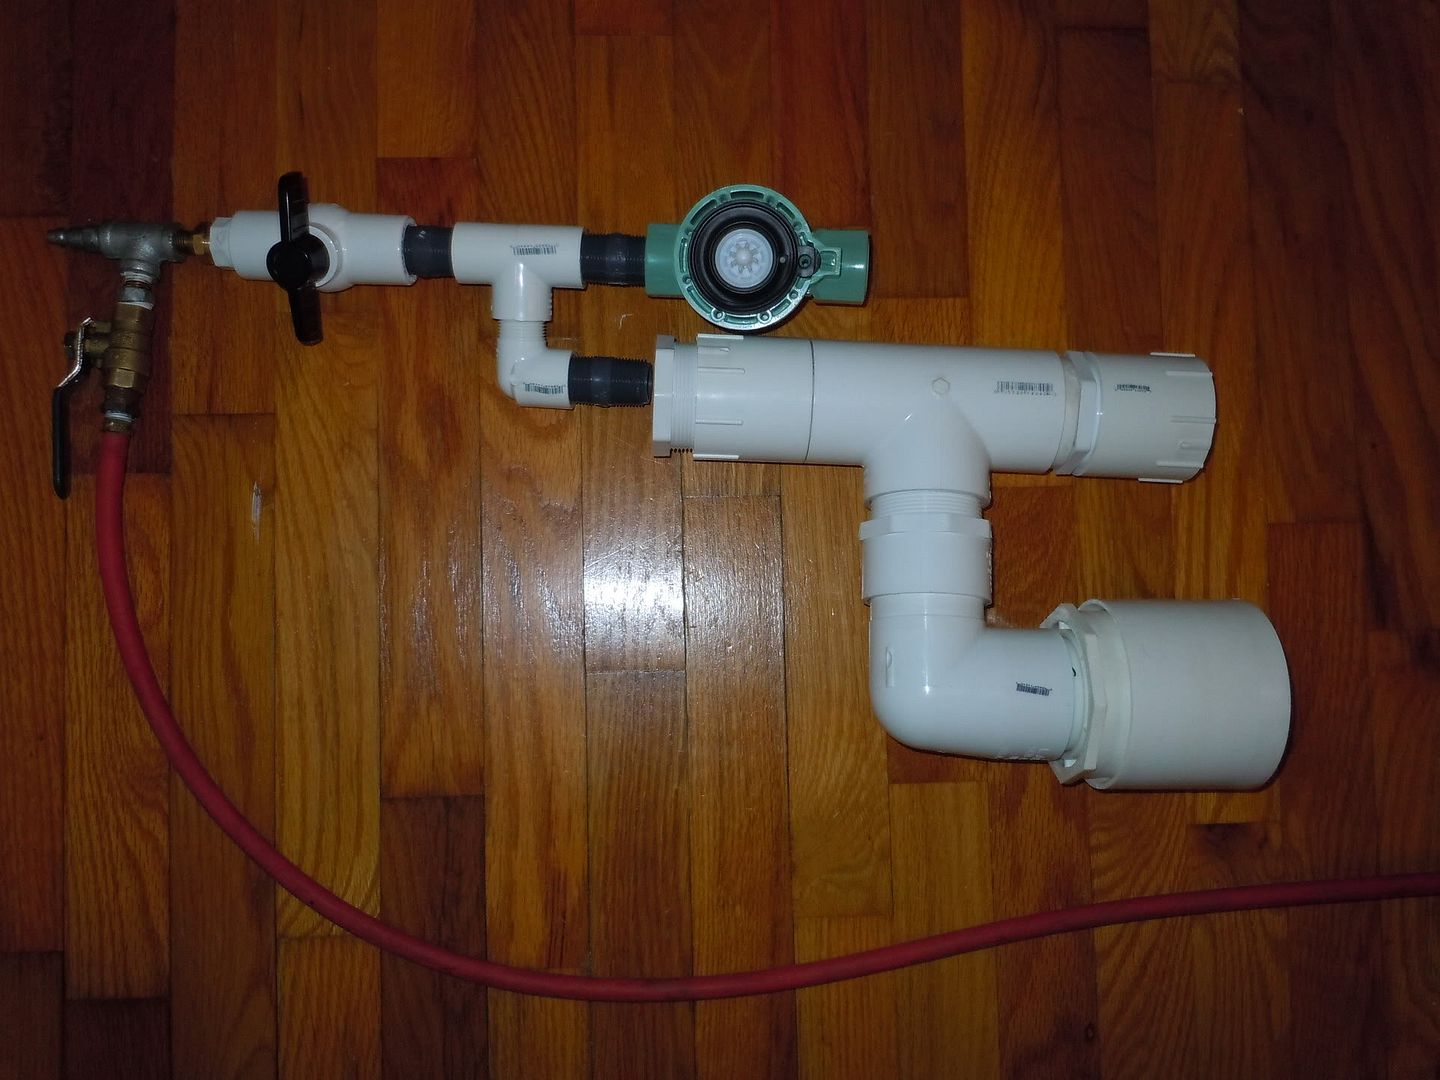
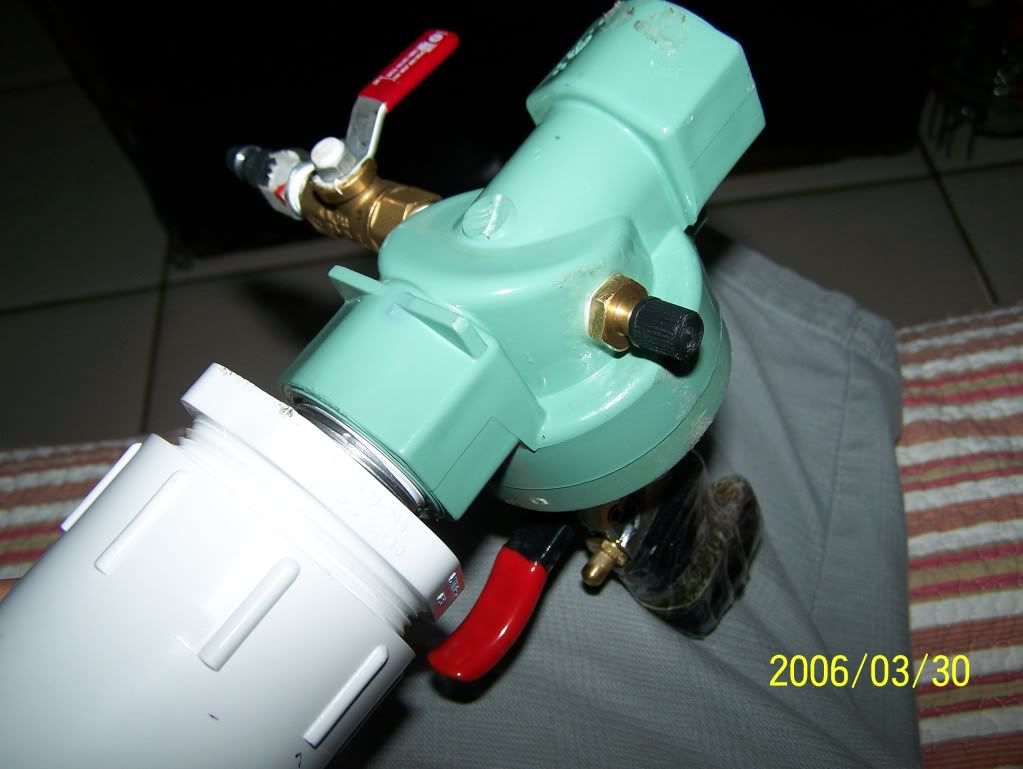
On your second picture, what is the schrader valve looking thing for? Because you already have the quick disconnect on the other side.
Also if I did that, then I don't know where I would put the hose to the chamber. AND, I don't trust myself to do that.
I did however come up with a different configuration. It will be a fair amount shorter than this because when I actually put everything together I will tighten everything. They are just one or two turns in.
Sorry it takes me so long to respond, but I usually try several different things before responding in an attempt to try what you guys suggest.
-
Gun Freak
- Lieutenant 5
- Posts: 4971
- Joined: Mon Jan 25, 2010 4:38 pm
- Location: Florida
- Been thanked: 8 times
The schrader valve was for filling with a bike pump.

I don't understand what you mean by that...Also if I did that, then I don't know where I would put the hose to the chamber.
Still I don't see why you need the extra volume, but if you have your heart set on it then go for it. I did the same thing.different configuration
OG Anti-Hybrid
One man's trash is a true Spudder's treasure!
Golf Ball Cannon "Superna" ■ M16 BBMG ■ Pengun ■ Hammer Valve Airsoft Sniper ■ High Pressure .22 Coax
Holy Shat!
One man's trash is a true Spudder's treasure!
Golf Ball Cannon "Superna" ■ M16 BBMG ■ Pengun ■ Hammer Valve Airsoft Sniper ■ High Pressure .22 Coax
Holy Shat!
the red hose is going to go directly into the chamber so that i can fill the cannon faster.
My question is that does your suggestion reduce flow when filling? Because the whole reason for all the added volume is so that I can fill it faster.Now I am working on the sprinkler valve and the air fill connection, but have a question. Should I just have the air go directly into the pilot and leak around the piston to fill the chamber or should/could I do something like the picture below? and yes, the sprinkler is apart, my dad is taking it to work to drill and tap the hole for the hose and blowgun.
The idea is that I hook up my compressor and then open the pvc valve, and pressurize the pilot. then I open the metal valve to pressurize the chamber , all the while keeping the pvc valve open. Then once the whole thing is filled I close both valves and disconnect my compressor.
-
Gun Freak
- Lieutenant 5
- Posts: 4971
- Joined: Mon Jan 25, 2010 4:38 pm
- Location: Florida
- Been thanked: 8 times
All of the layouts you posted are pilot fills. None of them go directly to the chamber. They all have to leak around the piston.kotabuuki wrote:Because the whole reason for all the added volume is so that I can fill it faster.
The thing is, even in the picture you posted, the air has to go into the pilot and around the piston. That is generally they way people go. It allows the use of a piston with a built in check valve and eliminates the need for a spring. When you chamber fill (fill air in front of the piston, not from the pilot), not only does this rule out the possibilty for your piston to have a check valve because then it would just move back and allow airflow out the barrel port, but it also creates the need for a spring behind your piston to hold it sealed while air fills the pilot. The spring is acting against the piston when triggered, making less flow therefore less power. Thus I proposed putting the sprinkler valve directly behind the pilot and tapping the fill valve somewhere on the sprinkler valve or the fitting connecting it to the pilot. This will condense your pilot volume and make a more compact and powerful launcher. 8)Should I just have the air go directly into the pilot and leak around the piston to fill the chamber or should/could I do something like the picture below?
OG Anti-Hybrid
One man's trash is a true Spudder's treasure!
Golf Ball Cannon "Superna" ■ M16 BBMG ■ Pengun ■ Hammer Valve Airsoft Sniper ■ High Pressure .22 Coax
Holy Shat!
One man's trash is a true Spudder's treasure!
Golf Ball Cannon "Superna" ■ M16 BBMG ■ Pengun ■ Hammer Valve Airsoft Sniper ■ High Pressure .22 Coax
Holy Shat!
-
Technician1002
- Captain
- Posts: 5189
- Joined: Sat Apr 04, 2009 11:10 am
I did not use a spring in either my Mouse Musket or the cannon pictured above. I tried one in the mouse musket, but the narrow ratio (seat to OD) valve won't open with a spring. A puff of air into the pilot both closes the valve and provides a small amount of chamber pressure to hold it closed for filling into the chamber.
ok, well since my piston is solid acrylic, how would I go about installing a check valve?
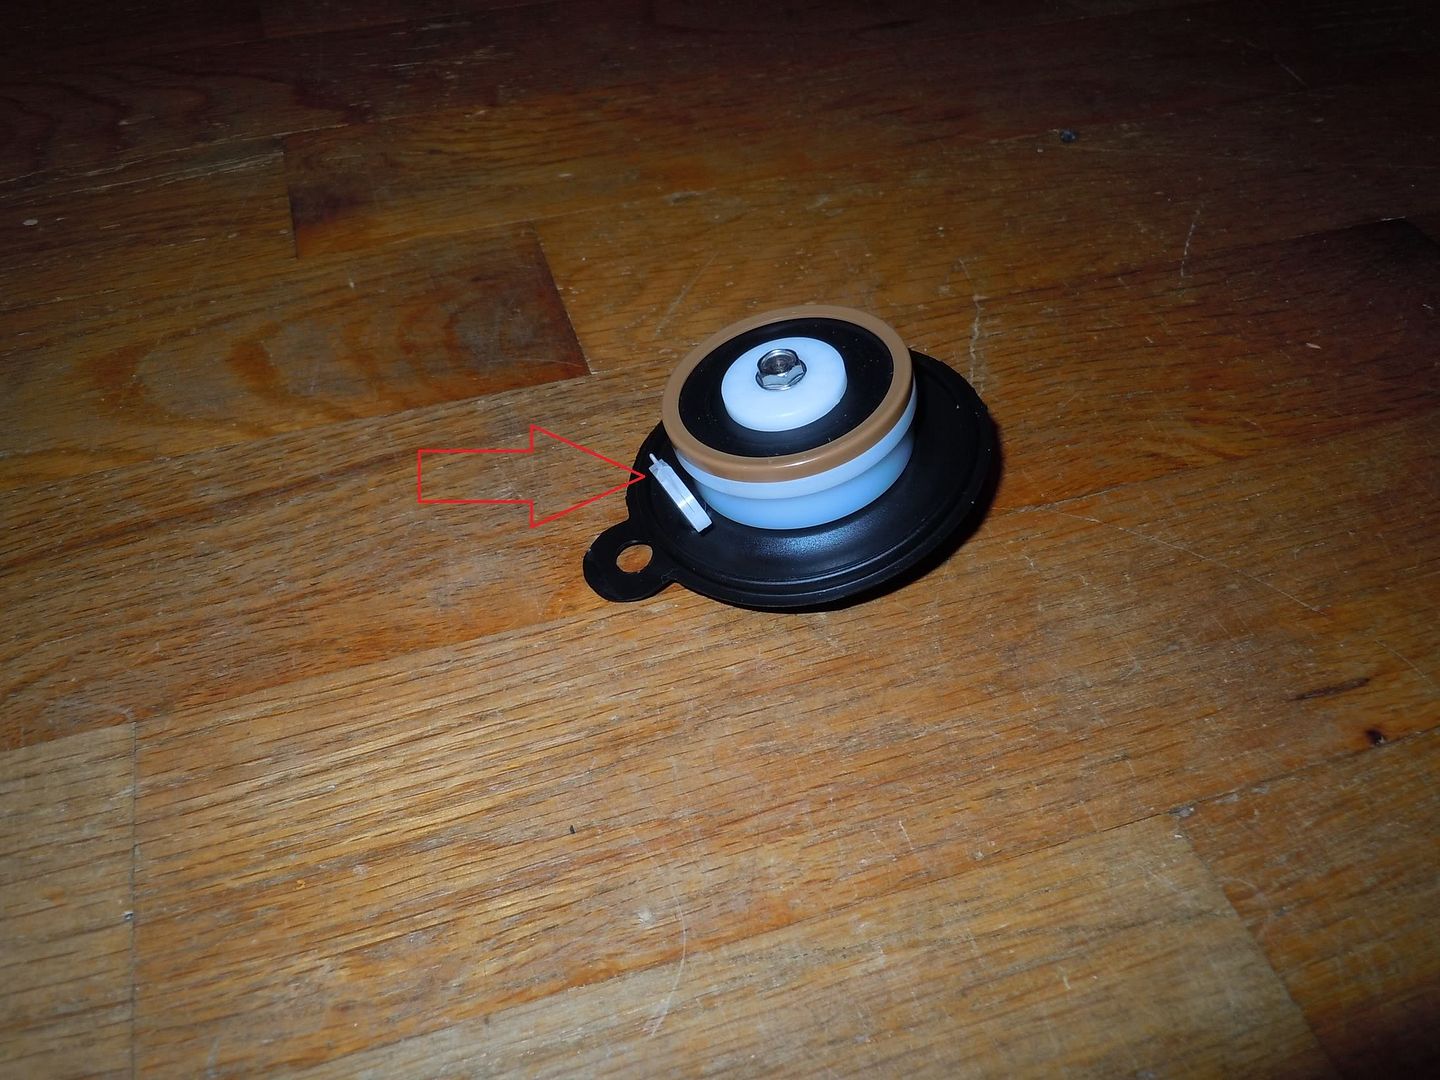
Also I got my sprinkler valve back today, and was wondering, I HAVE to fill BOTH holes correct? And did your valve have this plastic piece in it? I read somewhere that if I remove it, then it will make it perform better.
(you have to click the pictures, b/c you can't see the arrows very well)
Holes
This plastic piece
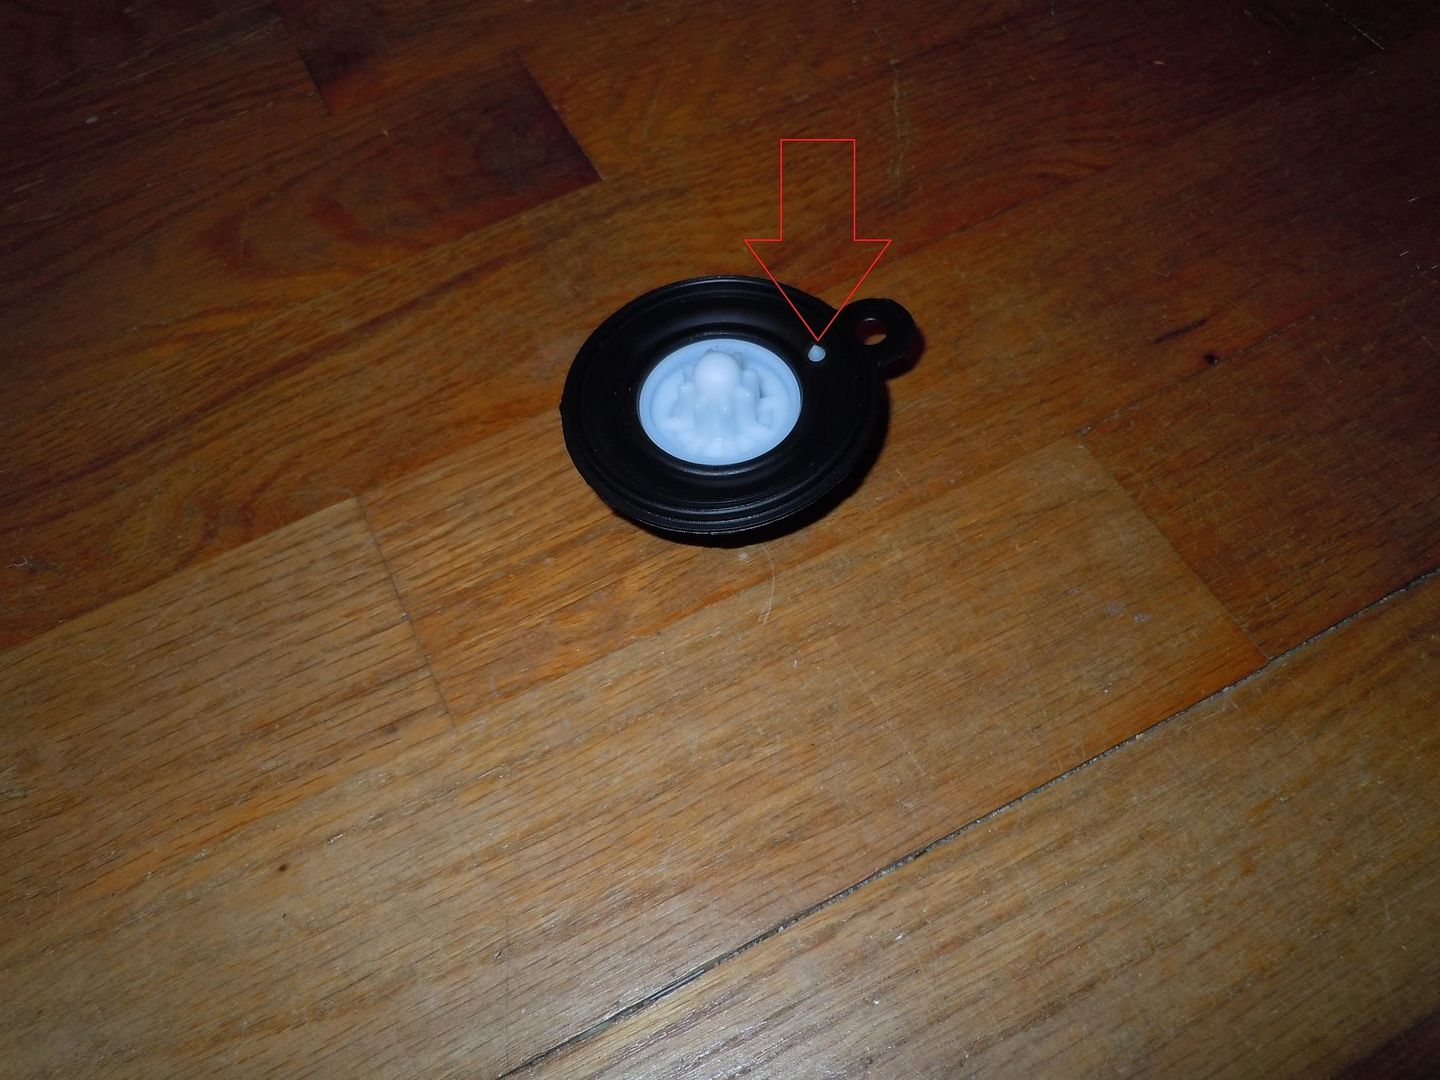
alternative view
Also I got my sprinkler valve back today, and was wondering, I HAVE to fill BOTH holes correct? And did your valve have this plastic piece in it? I read somewhere that if I remove it, then it will make it perform better.
(you have to click the pictures, b/c you can't see the arrows very well)
Holes
This plastic piece
alternative view
-
Lockednloaded
- Staff Sergeant


- Posts: 1566
- Joined: Thu Sep 03, 2009 9:38 pm
- Location: Texas, USA
- Been thanked: 7 times
A check valve on a piston is useless without O-rings, I wouldn't go to the trouble of doing either your first time around. Get it working, then make modifications to improve the valve.
Fill the solenoid hole (first pic) with epoxy, and IMO you should remove the "plastic thing" it only limits flow. I have always removed them when modding sprinkler valves
Fill the solenoid hole (first pic) with epoxy, and IMO you should remove the "plastic thing" it only limits flow. I have always removed them when modding sprinkler valves
I love lamp
There are two holes on the first picture, so i'm assuming I must fill both.
I know, I have SOOO many questions, but most of them are just for clarification. Since this is my first I am still learning so much, even though I tried to do as much research as possible.
also, I got the last piece that I need today. So I am hoping to to have it build by the end of Wednesday. I have a bunch of tests the next few days so I don't have much free time. But when It's done I'll definitely put a bunch of pics in a new thread. (and give credit to you guys for helping me sooo much.)